Have you ever found it frustrating to build AI agents that perform multiple tasks? LangGraph Studio is here to solve this problem by offering a visual and interactive way to design, manage, and debug agents. Built on the LangGraph framework, this desktop tool lets you create agent workflows using a simple drag-and-drop interface. You can see each step live in a graph, pause and inspect the flow, and even update the agent while it runs. With support for memory, planning, and tool usage, plus easy integration with LangSmith, LangGraph Studio makes building complex agents much easier and more manageable.
Table of contents
LangGraph Studio
LangGraph Studio is a specialised integrated development environment (IDE) that helps you build, visualise, and debug complex agentic AI applications using the LangGraph framework. Unlike traditional IDEs, it gives us a visual and interactive way to work with AI agents. These agents can perform multi-step tasks, use different tools, and handle complex tasks using large language models.
Core Features and Capabilities
Let’s see some of the features and capabilities of LangGraph Studio.

1. Visual Graph Editor
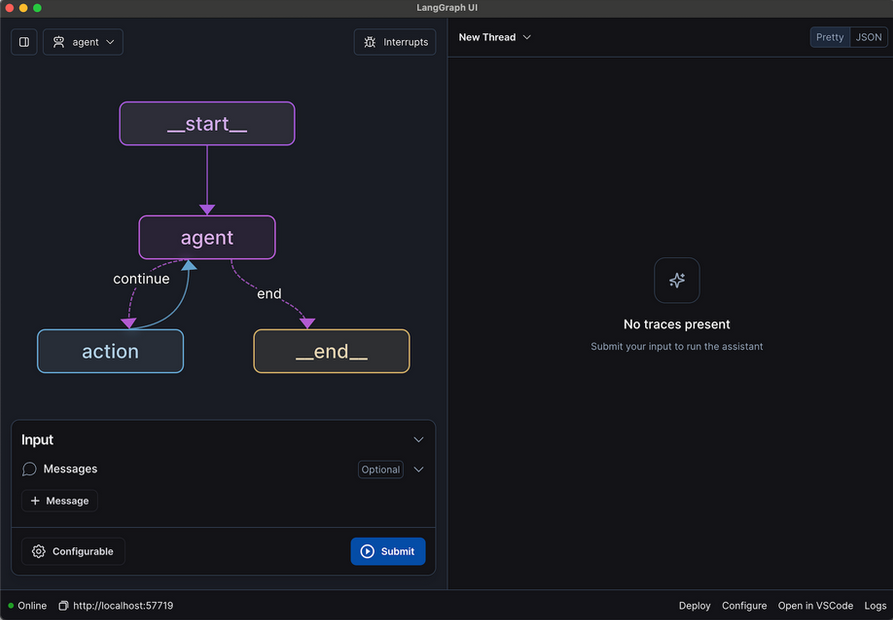
The Visual Graph Editor lets you create agent workflows using a simple flowchart interface. Agent workflows can be built by simply dragging and dropping blocks, also known as nodes, and connecting them with lines, called edges, making it easy to understand how tasks flow from one to another. As you make changes to the code or settings, the entire workflow is displayed as a live visualization, where the graph is updated in real-time, allowing you to see how everything is connected and working together.
2. Real-Time Debugging and Interaction
Step-Through Execution helps in debugging the agents by letting you pause the process at each node. We can always check what’s happening at any point and then go back to earlier steps, and fix the issues using a “time travel” feature. With Interrupts, we can stop the execution before or after any step, change the agent state or response, and then continue with the new data. This is helpful when we want to test different results or try out new ideas. Human-in-the-Loop also allows us to add manual input or updates at any point, which is useful when human feedback is needed during the workflow.
3. Interactive Testing and Iteration
Live Testing lets us run agents directly from the screen, send questions or tasks, and see the answers in real time. We can also get the output in a clear format, like a structured API response. With Modify and Replay, we can quickly change the code or prompts in our editor (like VS Code), and those changes will show up right away in the Studio. This means that we don’t need to start over each time. Fork and Edit Threads let us change the state of a running task and create a new version from that point, so that we can try different ideas and test what works best.
4. Collaboration and Integration
In LangGraph Studio, real-time editing and project sharing allow the team to work together on agent design and debugging. LangSmith integration allows us to connect for advanced observability, tracing, evaluation, prompt engineering, and dataset management, all from within the Studio. Also, LangGraph allows us to use built-in tools for version control, documentation, and project organisation.
5. Advanced Agent Features
With Memory and State Management, we can build agents that remember our past conversations, plan next steps, and make smart decisions based on changing inputs. Assistant and Thread Management allow us to create and handle many assistants and conversation threads, which will keep track of long-term memory and test our agents using different datasets. Flexible Deployment means we can easily package and run the agents in different places, like the cloud or edge devices, and keep them updated without worrying about the platform.
6. Modes for Different Users
LangGraph Studio offers different modes like Graph Mode for a full-featured, detailed view for developers, exposing execution paths, node traversals, and intermediate agent states. Chat Mode, on the other hand, is a simplified interface for business users or those testing chat-specific agents and focusing on overall agent behaviour and conversation flow.
How to Use LangGraph Studio
LangGraph Studio is a desktop app that is currently available only for Apple Silicon (MacBooks with M1, M2, or M3 chips). If you have a compatible device, then follow these instructions:
Install LangGraph Studio
To get started with LangGraph Studio, follow the steps below:
- Download: First, visit the GitHub repository to download the latest version of LangGraph Studio for your Operating System.
- Installation: Once you have downloaded, run the installer and then follow the on-screen instructions to complete the installation.
Set Up LangGraph Studio
Now, set up a LangGraph app within your project. You can clone an example repo that uses a requirements.txt file for dependencies:
git clone https://github.com/langchain-ai/langgraph-example.gitNext, you can create and configure a .env file with your OpenAI, Anthropic, and Tavily keys:
cp .env.example .env

echo "OPENAI_API_KEY=\"$OPENAI_API_KEY\"" > .env
echo "ANTHROPIC_API_KEY=\"$ANTHROPIC_API_KEY\"" >> .env
echo "TAVILY_API_KEY=\"$TAVILY_API_KEY\"" >> .env
So, once your project is set up, you can start using it with LangGraph Studio.
When you launch the LangGraph Studio desktop app for the first time, you will need to log in via LangSmith to authenticate your session.

Next, you will need a file called langgraph.json. This file tells LangGraph Studio where your agent is, what extra tools are needed, and which environment settings to use. You can create this file inside LangGraph Studio or add it manually to the folder. There are example folders on GitHub if you want to see how it’s done.

Once the folder is ready and opened, LangGraph Studio will set up everything needed to run the agent. After this, we will be able to see a visual graph showing the agent’s steps, and a box where we can talk to the agent.

And as we use the agent, we will see it working step by step in real-time. It will show us which tool or function it is using and how it moves forward. If something goes wrong or the agent starts doing something we don’t want, we can pause it anytime. We can also turn on ‘debug mode’ where the agent stops after each step, so we can check and fix things as it goes.
Advantages of Using LangGraph
Here are the advantages of using LangGraph:
- Easy to design complex workflows: This visual graph editor is very useful as it helps us to see and control how agent flows through nodes and edges, making it simpler to build and understand complex multi-step processes.
- Live debugging and state control: We can always pause execution, inspect or change the agent state at any point, and then continue or rerun steps. So this makes it much easier for us to debug and test the agents.
- Powerful flexibility with full control: As a low-level framework, it supports advanced flows like loops and parallel tasks. And we can also decide how exactly the agent should work, including tool calls and memory management.
- Great ecosystem and integrations: LangGraph goes very well with LangChain tools such as LLMs, databases, APIs, and connects with LangSmith for tracking and debugging. We can also deploy agents to the cloud or serverless environments.
- Supports multi-agent coordination: We can build systems where multiple agents can work together, which can be very useful for drafting, reviewing, tool use, retrieval, and more.
Limitations of LangGraph Studio
Here are some of the limitations of LangGraph Studio:
- Mac‑only support (for now): LangGraph Studio only runs on Apple Silicon Macs, which means if you’re using Windows or a non-Mac system, you can’t use it yet.
- Steep learning curve & unclear docs: It’s powerful, but many find it hard to learn, especially at first. The docs and tutorials aren’t always easy to follow, and beginners often get stuck.
- Too much for simple use cases: If your agent workflow is pretty basic, LangGraph might overdo it. It needs a lot of setup graphs, states, and edges when a simple script or chain would do.
- Messy code structure & maintainability issues: Users report that their agent logic can become hard to manage. There are often many layers of wrappers and explicit state definitions to maintain.
- Runtime issues and hallucination loops: LangGraph can sometimes create weird loops where the agent talks to itself endlessly. That leads to higher costs, longer runtimes, and even reinforced hallucinations.
Conclusion
LangGraph Studio is a tool that helps you build AI agents more easily. It gives you a visual way to design and manage workflows. Now you can debug live, manage memory, and integrate tools quickly. This saves time on coding and lets you focus on the agent’s tasks. While there’s a learning curve, its real-time features make development smoother and easier. Whether your agent is simple or complex, LangGraph Studio simplifies the process.


